Chapter
1
User Profile Configuration
User Profile is created to enable more than one user to share one computer or one copy of Netscape communicator. For a single user, separate user profiles can be created to handle mails from Sabah.Net and TMnet or Jaring. This Chapter will show you how to set up user profile.
For Microsoft Windows XP
users:
Step 1:
From the ‘start’ menu, go to ‘All Programs’, ‘Netscape 6, choose ‘Profile Manager’ as shown in the
following (please click on the image to get a larger view):

Figure 1.1
Step 2: In the ‘Profile Manager’ window, click on the ‘Create Profile’ button to create a new user profile.
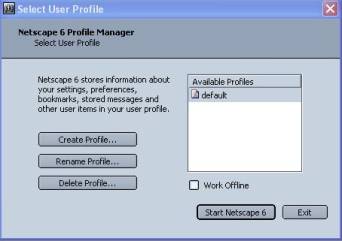
Figure 1.2
Step 3: You will be prompted to create a new profile to differentiate users with desired names. You may put your name as a profile name. Click on ‘Next’.
If you have received a
confirmation on your Sabah.Net account activation from Sabah Net Sdn. Bhd. Or Unit Kemajuan IT (KIT),
key in the details as given in the letter. For example, if a Government user called Ahmad Zulkifri received
a letter from the UST with the following details:
|
Login
name: Ahmad.Zulkifri |
|
Password:
eg9999 |
|
Email
Address: Ahmad.Zulkifri@sabah.gov.my |
|
Outgoing
mail (SMTP) server: smtp.sabah.gov.my |
|
Incoming
mail server: mail.sabah.gov.my |
Key in the details as
needed in the next steps
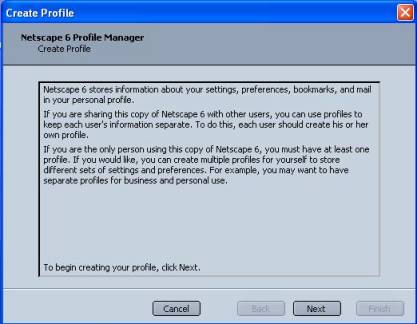
Figure 1.4

Figure 1.5
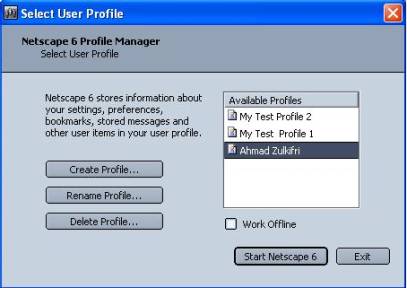
Figure 1.6
Step 4: Change the profile
name that you prefer. In the case of multiple users sharing the same terminal,
it is suggested that the respective user name to be used as the profile name
for his or her respective profile.
Step 5: To start the Netscape profile, choose your
profile and press “Start Netscape 6” button. Click “Activate”.
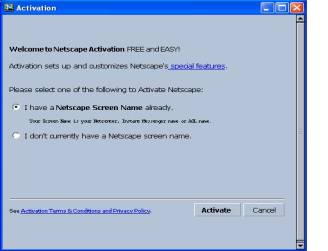
Figure 1.7
Step 6: The following screen prompt you to activate
free existing Netscape User. You may
choose to fill in the details for Screen Name & Password and click
“Activate”. If you are not an existing
member, click for new member. Click “Activate”.
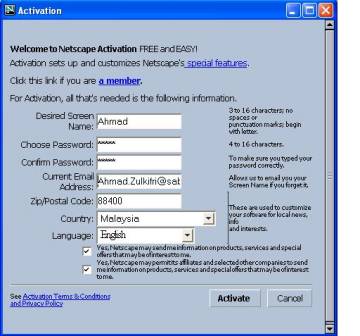
Figure 1.8
Step 7: If you do not wish to activate, click
“Cancel” Or you may click “Cancel” to quit screen. Click “OK”.
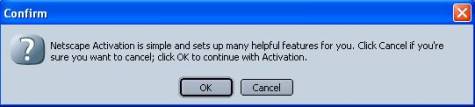
Figure 1.9
Step 8: Netscape browser will appear when a Netscape
profile is opened.
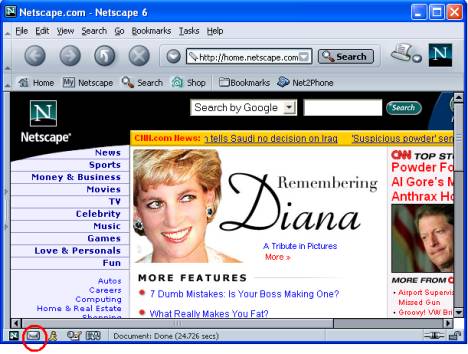
Figure 1.10
EMAIL CONFIGURATION
Step 9: At the browser,
click on the envelope icon at the lower left side of the screen as highlighted
in the above diagram. You can also go to the menu on the browser, click on
Edit”, “Prefference”, “Mail & News
Groups”. Select your account as “ISP or email provider”. Click “Next”.
Step 10: Ensure your correct entry at ‘Your name:’
dan ‘Email address’ following the details given in your Sabah.Net account
confirmation letter . Click “Next”.
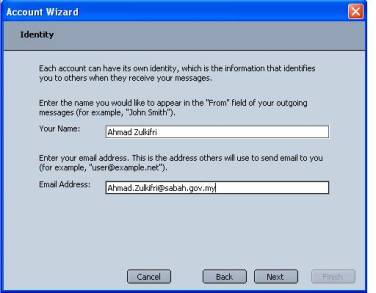
Figure 1.11
Step 11: Make sure that your ‘Mail server type’ is
set to POP3. Key-in ‘Server Name:’ These
details should be the same as Login Name as given by Sabah.Net. Then put in the
‘Server Name’. In the example, mail.sabah.gov.my is your Server Name. Next, set your Outgoing Server (SMTP) as: smtp.sabah.net.my.
When finish, click ‘Next
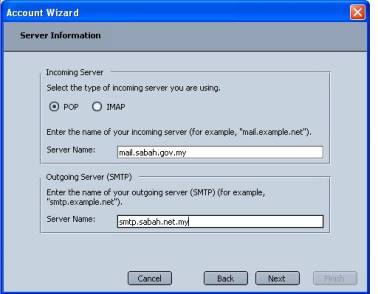
Figure 1.12
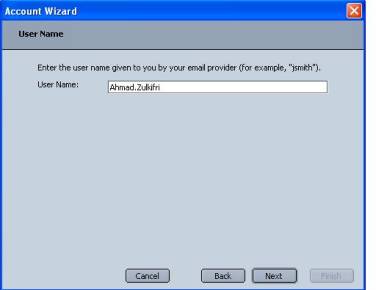
Step 12: The next page
will prompt for “User Name”. In this example, User Name is:
‘Ahmad.Zulkifri’. Key in your details
accordingly.
Rajah 1.13
Step 13: You can put your preffered name.
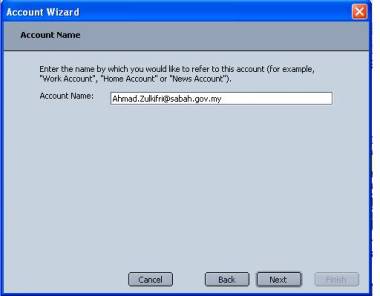
Figure 1.14
Step 14: Click “Next” will result the details you
have just keyed-in. Click “Finish” to end this session.
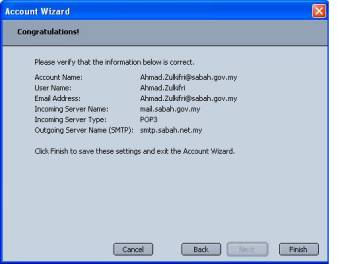
Figure 1.15
Step 15: Upon completing this task, it will promt you
for password. Type in your password as
given.
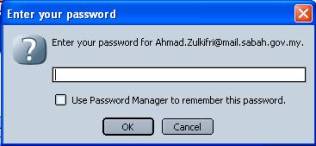
Figure 1.16
Step 16: You have just completed creating a new email
profile.
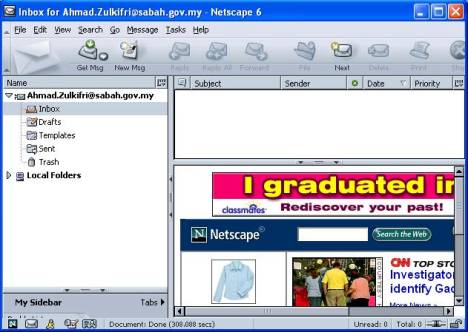
Figure 1.17
Chapter 2
Browsing the State Wide Web (SWW)
The purpose
of this chapter is to provide you with the necessary skill that required in
browsing the State Wide Web (SWW) using the Netscape Navigator.
2.1 About the Netscape
Navigator browser window
The Navigator browser window displays a homepage, the page you see each time you start Navigator. Navigator is preset to display the Netscape homepage. However, you can change this to your own preference. The default home page for Sabah.Net users is at http://www.sabah.net.my. In the following example, the starting page has been set to http://sww.sabah.gov.my/. To do this, refer to section 2.11, Setting The Default Page.
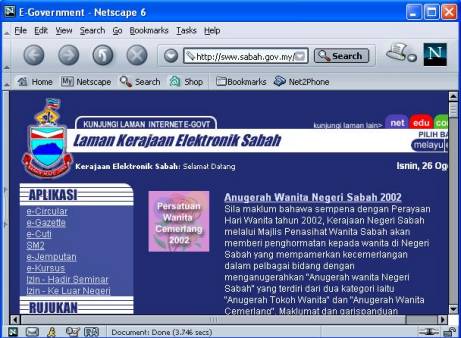
Figure 2.1
Like an
address, the URL (Uniform Resource Locator) tells Navigator where to find the
page. The URL for the Sabah.Net main page is http://www.sabah.net.my
and Intranet URL is http://sww.sabah.gov.my.

Rajah 2.2
4.3 Switching to
Navigator's other components
Click one
of the buttons in the component bar to open or switch to a Communicator
component. Alternatively, you can choose the name of a component from the
Communicator menu.

Figure 2.3
Navigator menyediakan
beberapa cara untuk anda melihat maklumat sesuatu laman. Sila rujuk kepada **Netscape Communicator User Guide
Handbook
(Note For Sabah Net Webmaster:
Refer to attached file) ** untuk mendapat keterangan yang selanjutnya tentang
bagaimana untuk melihat maklumat laman dan fungsi-fungsi ikon Toolbar untuk
Netscape Navigator.
Navigator provides several ways for
you to see page information. Please refer to Netscape
Communicator User Guide Handbook **(Note For Sabah Net
Webmaster: Refer to attached file – revguide.pdf) ** to get
detailed information on how to view page information and the functions of the
toolbar icons for Netscape Navigator.
2.5 Viewing other pages
To look at another page,
- Click a link on a page (also called a hyperlink), or
- Type a URL in the Location field.
2.6 Bookmarking
Bookmarks
provide a permanent way for you to mark pages that you often visit. Unlike the
history list, which gets discarded when you quit Communicator, bookmarks stay
in the bookmark list until you remove them.
2.7 Creating a bookmark
Step 1: Go to the page you want to mark.
Step 2: Hold down the Bookmarks button to display the Bookmarks menu.
Step 3: From the Bookmarks menu, choose Add Bookmark to add a bookmark for the current page to the bottom of the Bookmarks menu.
2.8 Returning to a page using a bookmark
From the list of bookmarks, choose
the bookmark of the page you want to see.
2.9 Adding a bookmark to a folder
Step 1: Go to the page you want to create a bookmark for.
Step 2: Drag the page proxy icon (located to the left of the Location field) over the Bookmark button, so that the list of bookmarks appears.
Step 3: Choose the folder
into which you want to put the bookmark. When you release the mouse button,
Navigator adds the new bookmark to the chosen folder.
2.10 Organising your bookmarks
When you change the arrangement of bookmarks in the Bookmarks window, Navigator updates the Bookmarks menu automatically. To display the Bookmarks window:
Step 1: From the Communicator menu, choose Bookmarks, and then choose Edit Bookmarks.
Step 2: The Bookmarks
window displays bookmarks and bookmark folders in a list, arranged like files
and folders on your hard disk. The bookmark names are the same ones that appear
in the Bookmarks menu, except that the Bookmarks window provides many more
commands for organizing your bookmarks.
2.11 Setting up the default page
Whenever you start Navigator, a default page will be downloaded automatically by the browser. You can actually set your favorite web page as your default page.
Step 1: Go to the page that you want to use as your home page. For Sabah.Net, it is recommended that you go to http://www.sabah.net.my.
Step 2: From the Edit menu, choose Preferences.
Step 3: Click Navigator in the Category list.
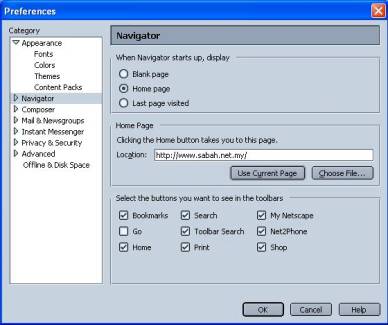
Figure 2.4
Step 4: Click ‘Use Current Page’ or
type the page's URL. Then, click OK.
2.12 Printing a page
Step 1: Go to the page you want to print.
Step 2: From the File menu, choose Print or click the Print button in the Navigation toolbar.
Step 3: Choose the printing options you want. Then, click OK.