Chapter
1
|
|
Login Name: Ahmad.Zulkifri |
|
Password: eg9999 |
|
Email Address: Ahmad.Zulkifri @sabah.gov.my |
|
Outgoing mail (SMTP) server : smtp.sabah.net.my |
|
Incoming mail server : mail.sabah.gov.my |
Step 1:
From the Tools menu in Outlook
Express’s window, choose Accounts and
the screen as in Figure 1.1will
pop-up.
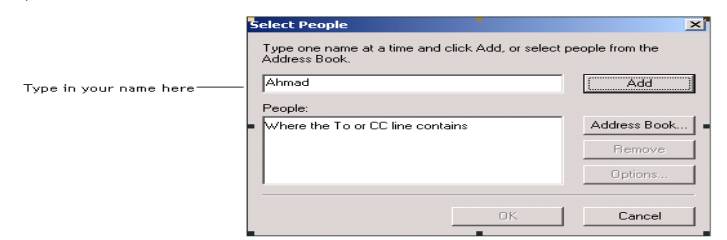
Figure 1.1
Step 2: Tab to Mail
category. Go to Add button and Mail (See FIgure 1.1).
Step 3: Type in your name
in the Display name box (see
Figure 1.2) as given in the activation letter by Sabah.Net (Sabah Net Sdn. Bhd. or Unit Kemajuan IT). Please refer to Figure 1.2
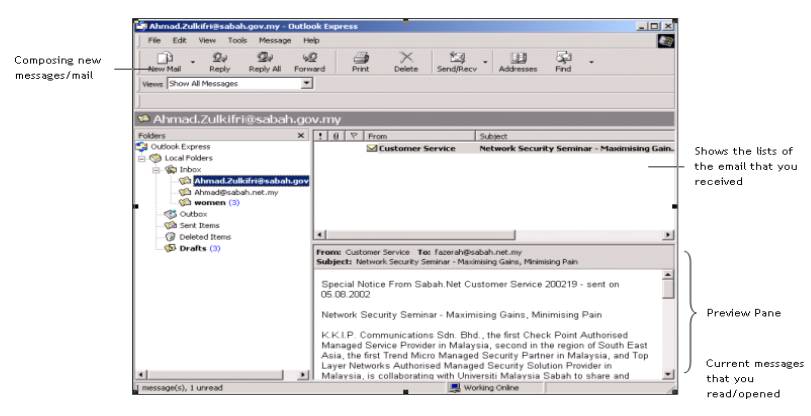
Figure 1.2
Step 4: Click Next
and choose ‘I already have an email address that I’d like to use’. Then type
in the email address as given by Sabah.Net or Unit Kemajuan IT (see the
example on Figure 1.3).
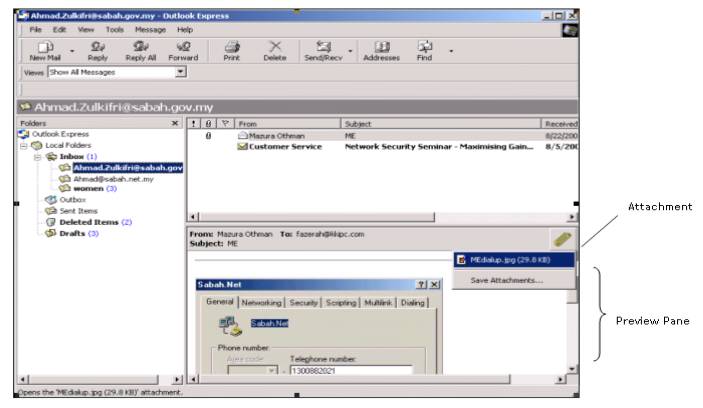
Figure 1.3
Step 5:
Click Next andtype in your email server name (as what has been given by Sabah.Net
or KIT). For further information about the exact setting for your mail
server, please refer to
section 1.3
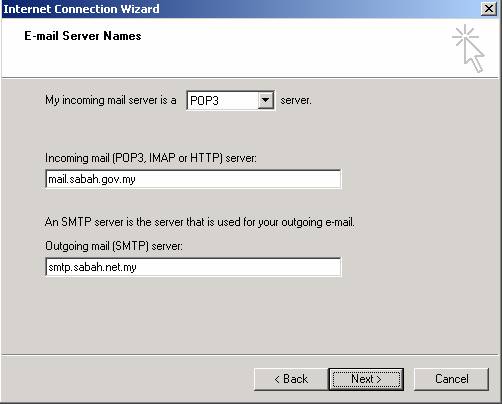
Figure 1.4
Step 6:
Click Next button and type in the
name for your account, as shown in Figure 1.5. If you want the computer to
remember your password, please tick ‘
Remember Password’ and just type in
your password, and if not skip this window and go to the next step.

Figure 1.5
Step 7:
Click Next and you will be
informed that you have successfully set up your email account.
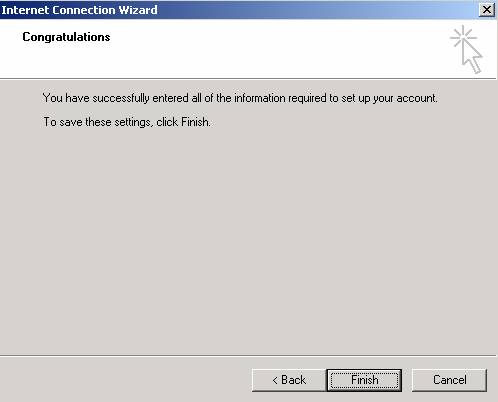
Figure 1.6
Step 8:
Lastly, click Finish and you will
be able to see the screen as shown in Figure 1.7 with the complete
informations about the account that you have just created. Please proceed to section
1.2. if you want to change the setting for the account
name that you just created (see the wording in blue color)
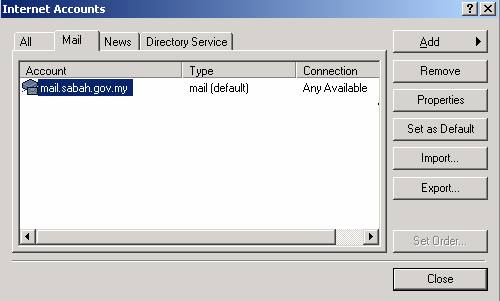
Figure 1.7
1.2 Change setting name for the email
account
Step
1: Go to Tools, and choose Accounts
(Figure 1.8 will pop-up), then
tab to the ‘Mail’ category. Click
Properties and you will see the
following screen, as shown in Figure 1.9.
Figure 1.8
![]()
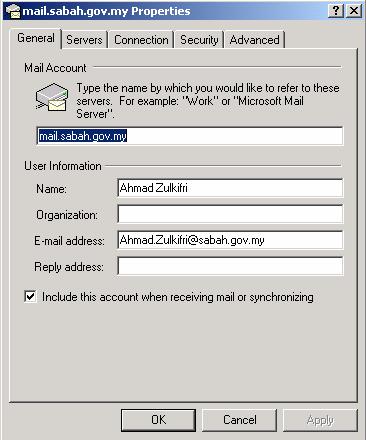
Figure 1.9
Step
2: Please type in your email address (as shown in the above screen) and tick
‘Include this account when receiving mail or synchronizing’, then click the Apply button.
Step
3: Tab to ‘Servers’ category and
make sure that the ‘Incoming’ and ‘Outgoing’ for your email is correct
(please refer to Section
1.3
for more details), see the example on Figure 1.10
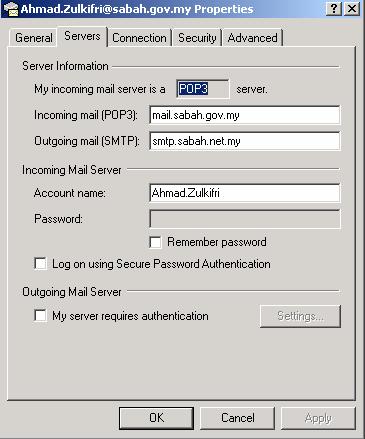
Figure 1.10
1.3 Configurations for Mail Server
In
this section, you will be given a brief overview about the
configurations/setting for your email account (depends on what type of email
account you are using). It is very important for you to make sure that your
email configurations are correct.
1.3.1 Configurations for Public Account (NET)
Incoming
Mel Server: mail.sabah.net.my
Outgoing
Mel Server: smtp.sabah.com.my
1.3.2 Configurations for Educational/Student (EDU)
Incoming
Mel Server: mail.sabah.edu.my
Outgoing
Mel Server: smtp.sabah.com.my
1.3.3 Configurations for Commercial (COM)
Incoming
Mel Server: mail.sabah.com.my
Outgoing
Mel Server: smtp.sabah.com.my
1.3.4 Configurations for Organisation (ORG)
Incoming
Mel Server: mail.sabah.org.my
Outgoing
Mel Server: smtp.sabah.com.my
1.3.5 Configurations for Government (GOV)
Incoming
Mel Server: mail.sabah.gov.my
Outgoing
Mel Server:smtp.sabah.net.my
1.4 Creating a Folder for each Email
account
This
section will explain to you on how to create a different folder for each
different email account.
Step
1: Go to Folders pane and
right-click your mouse, then on the menu choose ‘New Folder’ (see the given example in Figure 1.11). You will see
the following screen as in Figure 1.12.
![]()
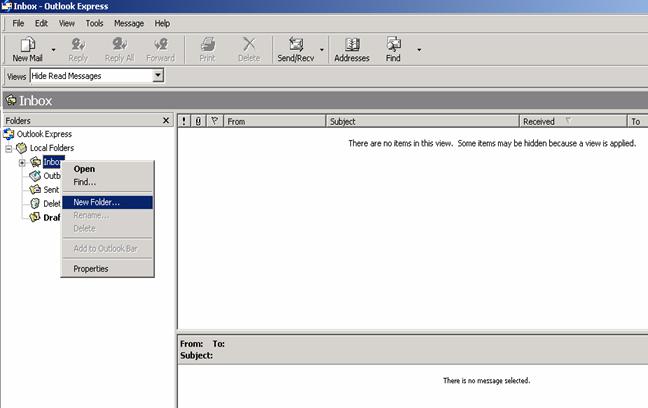
Figure 1.11
Step 2:
Type in the name that you want to use to refer the folder. The click ‘OK’.
See Figure 1.12
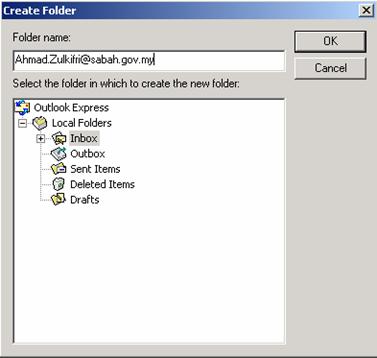
Figure 1.12
Please
note, in Figure 1.13 you will be able to see the folder which you have just created.
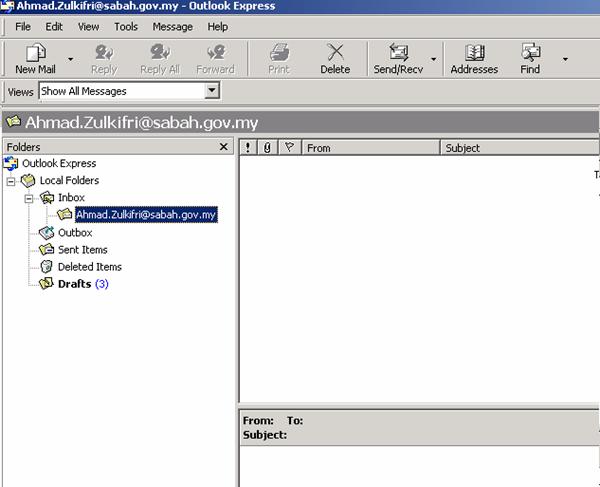
Figure 1.13
1.5 Making Rules for Message(s)
This
section describes you on how to set a rules for message(s) in each different
mail account(s)(if you have more than one email account), so that for every new
message(s) or email, it will be sent directly to the desirable folder. The
following rules given may be vary from what you want or have (this is just an
example so that you have a better understanding about it)
Step
1: Go to Tools, Message Rules and choose Mail.
Step
2: On the Message Rules menu (see
Figure 1.14) click ‘New’ button and
you will see the New Mail Rule
screen
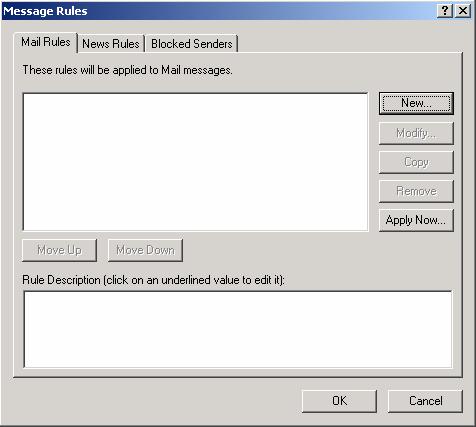
Figure 1.14
Step
3: Under menu 1 ‘Select you Conditions for your rule:’ please tick ‘Where
the TO or CC line contains people’.
Then go to menu 2 ‘Select the Actions
for your rule:’
and tick ‘Move it to the specified folder’ (please note that right after you selected the ‘Condition(s) dan
‘Action(s), a new wording in blue color will appears in menu 3 – see Figure
1.15).
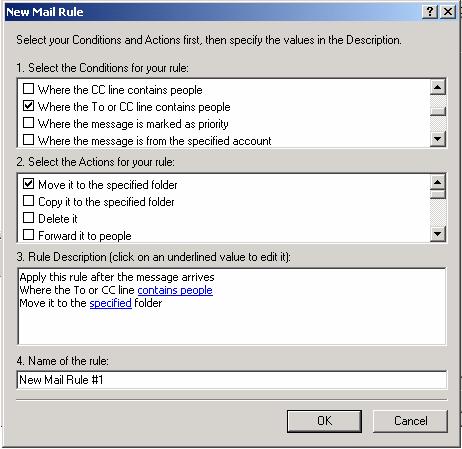
Figure 1.15
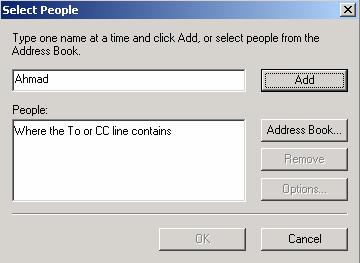
Step
4: In menu 3 ‘Rule Description’ click ‘contains
people’ and you will be able to see the
following screen (as in FIgure 1.16). Then type in your name or a word that
you want to refer to (see the example on Figure 1.16) and click ‘Add’ & ‘OK’.
Figure 1.16![]()
Step 5: Then click on the word ‘Specified’ and choose
the Folder which listed in your ‘Inbox’ – the folder should be the one that
you want to store the email for the chosen account (see figure 1.17).
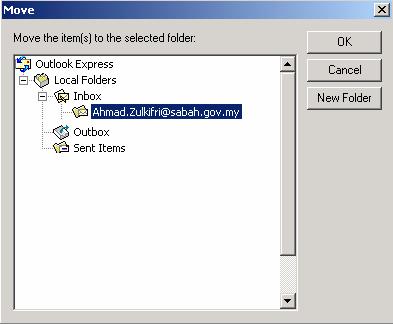
Figure 1.17
If you didn’t see any folder(s) under your Inbox, please click on the ‘New Folder’ button and type in the name for it.
Step 6: Click ‘OK’
and you will see the ‘New Mail Rule’
window (see Figure 1.18)
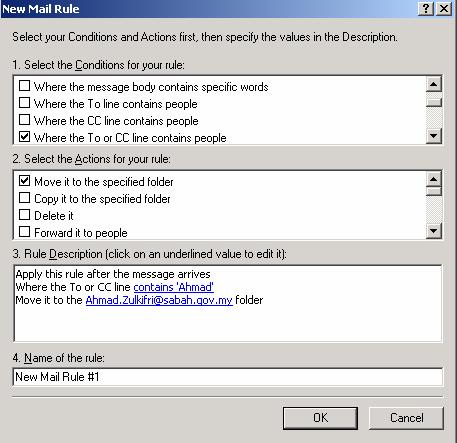
Figure 1.18
Step 7: Click ‘OK’
again and the Message Rules window
(as in Figure 1.14) will pop-up. The
click ‘OK’
1.6 Retrieving and reading new
message(s)
Step
1: Click ‘Send/Recv’ button in
Outlook Express’s toolbars and choose ‘Send
and Receive All’ (see Figure
1.19). Or you can click Ctrl+M on
your keyboard.
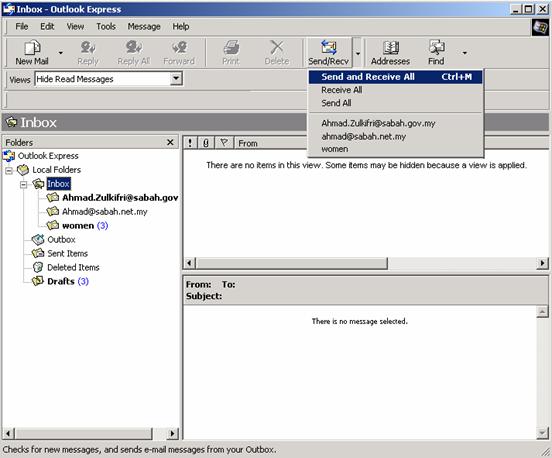
Figure 1.19
Step 2:
Key in your password in the password field and click ‘OK’ (see Figure 1.20)
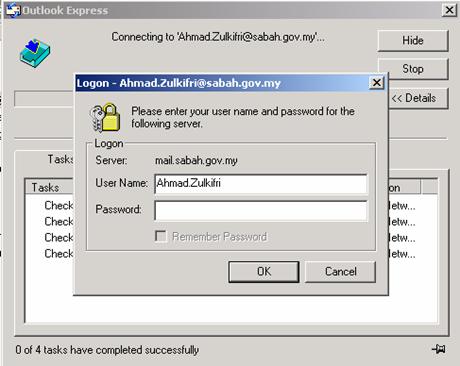
Figure 1.20
For every
new message(s) received, your account folder will changed color to ‘bold’
Step2:
Click the desirable folder to check/read your messages. See Figure 1.21
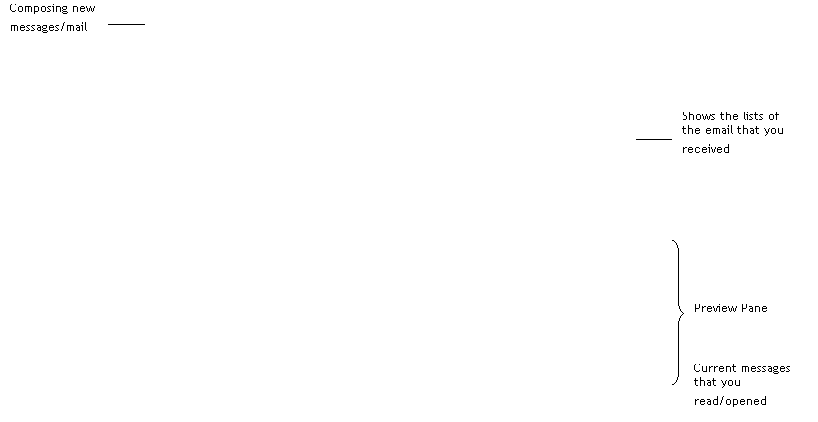
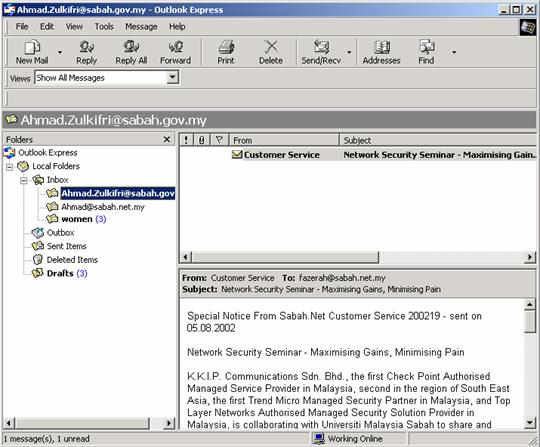
Figure 1.21
1.7 Composing a new message
When you create a new
message or when you reply to or forward an existing message, you will get a New
Message window so you can type the
text of your message. To get this window first you have to follow this step:-
Step 1: Click on the New
Mail button on your Outlook Express toolbar (see Figure 1.21), and the
following message window (as shown in Figure 1.22) will pop-up.
Type
your message here
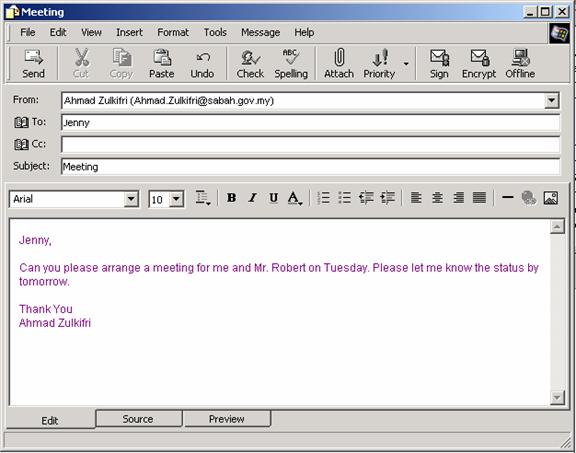
Figure 1.22
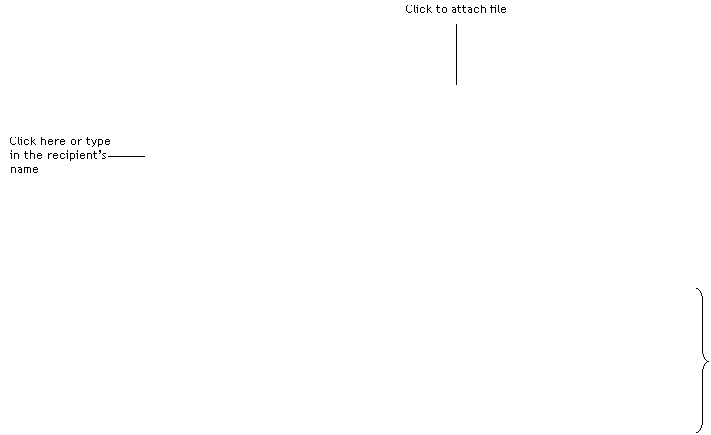
Step
2: Type in the recipient(s) email address in the To field, or you can choose from the address book just by simply clicking
on the To button.
Step
3: Type in all the necessary information and click the Send button.
1.8 Replying to a message
Step 1: Read the message you want to reply to.
Step 2: Click Reply if
you want to reply only to the person who sent you the message. Choose Reply
All if you want to reply to the person who sent you the message and also send
a carbon copy (cc:) of your reply to everyone else that received the original
message.
Step 3: You will now get the New
Message window (see Figure 1.22). In the composition window, check the
address area to make sure that the message is addressed the way you want.
Step 4: Type your message in the message composition area.
Step 5: Click ‘Send’ to
send the message.
1.9 Forwarding a message
Step 1: Select the message you want to forward.
Step 2: Click Forward.
Step 3: Type the address of the person or mailing list you want to send the message to, or click Address in the toolbar.
Step 4: Click in the message area and type any remarks you want to include with the forwarded message.
Step 5: Click Send.
1.10 Attaching a file to a message
Step 1: Click New Message in Outlook Express’s toolbar
Step 2: In the composition window, click on this
button![]() (see Figure 1.22)
(see Figure 1.22)
Step 3: Choose the file you want to include in the message.
Step 4: Click Attach.
Step 5: Lastly, click the Send button
Tip : To attach more than one file,
simply hold the Ctrl key in your keyboard
and select the file(s) you want to attach while still holding the key.
1.11 Deleting a message
Step 1: Select the header
of the message you want to delete. To delete additional messages, hold down
the Control (Ctrl) key and click on the additional messages.
Step 2: Right click your mouse and choose Delete.
1.12 Viewing and saving an attachment
Step
1: Click or highlight the mail which has an attachment and you will be able
to view the contains of it in your preview pane.
If the attachment is in MS Excel, Word or other format, then you have to
click on this attachment button![]() on the right side of your preview pane (see
Figure 1.22), and click ‘Open it’.
on the right side of your preview pane (see
Figure 1.22), and click ‘Open it’.
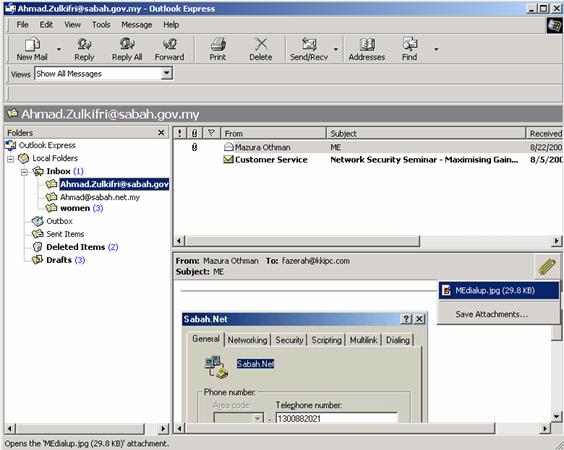
Figure 1.23
Step
2: To save the file/attachment, simply click ‘Save Attachments’ and you will
be able to see the following screen:

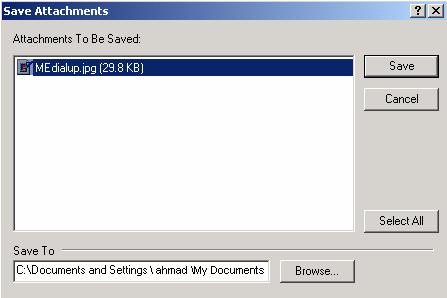
Figure 1.24
Step
3: Lastly click on the ‘Save’ button.
1.13 Changing Password
The procedures listed
here are for Electronic Government system users.
Users are recommended to change their passwords once a month for security reasons. To change you password, do the following:
Step 1: Launch Internet
Explorer
Note: You may have to inform and email to mailadmin@sabah.net.my if you want to use the new password for modem dial-up access.
Step 2: Go to this site: http://mail.sabah.gov.my:8888. For non-Government users, please go to the User Account Management page and follow the steps described in that page.
Step 3: You will be prompted for your username and password. Enter your login name and current password and click OK.
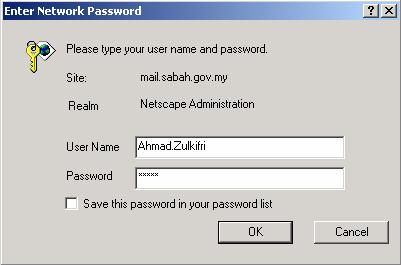
Figure 1.25
Step 4: Under ‘General’ click on ‘Change Password (Dialup & Emai)
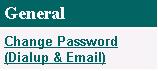
Figure 1.26
Step 5: Key in your User ID.
Then key in your current password in the Old Password field and key in your
new password in the last two fields.
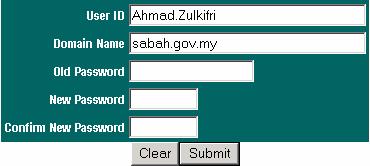
Figure 1.27
Step 6: Click Submit button
Note: You may have to inform and email to the mailadmin@sabah.net.my if you want to use the new password for modem dial-up access.