
Internet is a network of computer networks with other computer network which covering a very wide around the world. Internet is very useful for us to communicate and exchange information, files, data, voice, pictures, etc. between peoples around the world. Website is also known as a web page which is a file containing combination of text and code "markup". If the document viewed in a web browser, it shows a web page, but when viewed in a text editor such as Notepad it only displays text and code "markup".
Before you start to make your company website or personal website, you need to decide in advance the necessary in formation you publish on the Internet. Planning can help you to plan and make your web site.Personal Website
Most of the websites on the Internet is a personal website made by an individual. Personal website allows you to share information with friends, family members and others. Here are some of the information typically found on personal websites.- Personal Background
- Hobby
- Interest
- Contact
- Personal Information Photo Gallery
- Links to other websites
Business Website
More companies realize the potential of the Internet and they want to publish their web sites on the Internet because the Internet is a powerful marketing tool. Through the Internet they can sell products and services and also to advertise their companies to the world wide via Internet services. Here are some fo the information typically found on the business websites.- Company Background
- Our Mission
- Vision Statement
- Law
- Contact Information
- Reservations
The tool you need to write your HTML text is Notepad or Pspad or any text editor you have.


Once you have these tools, you can start to learn to make a web site.
- Create an HTML file
An HTML file is a text file that is stored in the. Html or. Htm.- Open editor on your computer (if you use Windows Notepad or TextEdit if you use a Mac). You can also use a special HTML editor like Dreamweaver or FrontPage if you wish.
- Create a new file
- Save the file as (your file name).Html example: demo.html
- Create HTML Code
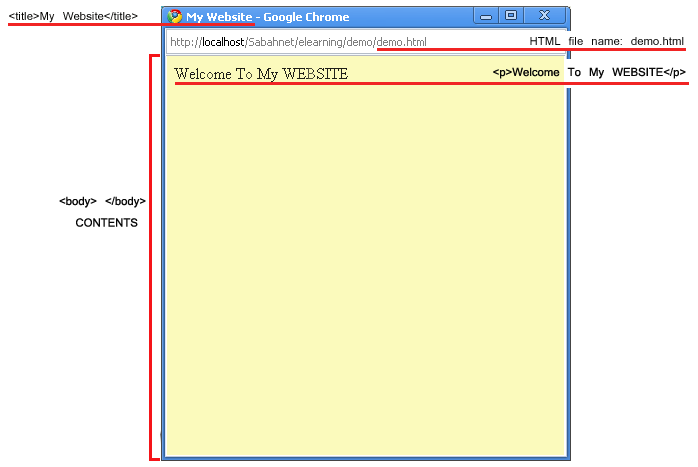
Here is an example of a simple HTML code:
<!DOCTYPE HTML PUBLIC "-//W3C//DTD HTML 4.01 Transitional//EN">
Click To View DEMO
<html>
<head>
<title>My Website</title>
</head>
<body>
<p>Welcome to my WEBSITE</p>
</body>
</html>
- See Results In Your Web Browser
Whether you are directed to your HTML file, then double click on it OR
Open a web browser on your computer such as Mozilla Firefox, Google Chrome, Internet Explore, etc.. Choose File> Open, then click "Browse". A dialog box will appear to encourage you to navigate to the file. Refer to your HTML file, then select "Open".
Explanation for Important HTML Tags
- <!DOCTYPE ...> This element is to tell the browser the HTML version of the document used.
- <html> considered as a platform for all other tags can be in it except the DOCTYPE tag!.
- <head> contains information not normally seen in the browser, such as meta tags, Javascript and CSS. However, the <title> tags can be excluded in this case.
- <title> displayed in the browser title bar (located at the top of the browser).
- <body> is the key to your content. This is where most of your code is or visits.
- <p> is the paragraph of the text on your web site.
Closing Your Tags
As mentioned in previous lessons, you can see the opening tag and closing tag, content tag will be placed in between them. However there are some exceptions to this rule.
Closing tag a little different with the opening tag. Closing tag contains a line (/) after the sign <. This tells the browser that this tag has been closed.UPPERCASE or lowercase?
Although most browsers will display your site, regardless of case you missed, you should always ensure that your HTML code in lowercase. This helps you out of trouble for the future of XML code.True: <html>
False: <HTML>
1. Meta Tag
Meta tag is usually used in the head tag. There are three important attributes in the meta tag are the author, decription and keyword. This meta tag not be closed with closing tags as others HTML tags.
- author, work to clarify the planning web site.
- description, this attribute works during we use the search engines. Search engine will find a description of what your web site via this attribute.
- keyword, work for the search engine automatically searches the data from your database.
<html>
<head>
<title>My Website</title>
<meta name="Author" content="Name of Planning WebSite">
<meta name="Description" content="Site description">
<meta name="Keywords" content="personal">
</head>
<body>
</body>
</html>
2. Body Tag
In the previous topic, you learn little about the body tag. Here you will learn more aboyt the body tags and the attributes that can be found in it. As you know, the body tag is pair of tag including the contents of your website. Some attributes that can be used in the body tag are:
- bgcolor, this attribute is used to determine the background color of your website. You can use either the color names such as red, blue, green, black or others, or use the html color code like # FF0000, # FFFFFF, # C0C0C0 and etc.
- text, this attribute is used to determine the color of the text on your web site. As bgcolor attribute, you can use either use the color name or color code in html.
- link, used to determine the color of hyperlinks before the click.
- alink, this attribute is used to determine the color of links when you click the link.
- vlink, this attribute is used to determine the color of the visited link.
<html>Click To View DEMO
<head>
<title>Attribute in body tag</title>
</head>
<body bgcolor=#E0FFFF text=black link=#153E7E alink=green vlink=red ><a href="http://www.sabah.net.my/" target=_blank> Sabah.Net </a> Official Website
</body>
</html>
- background, you can use this attribute to display an image as the background on your website you replace the bgcolor attribute.
<html>Click To View DEMO
<head>
<title>Attribute in body tag</title>
</head>
<body bgcolor=#E0FFFF text=black link=#153E7E alink=green vlink=red background="../images/background.jpg" > <a href="http://www.sabah.net.my/" target=_blank> Sabah.Net </a> Official Website
</body>
</html>
3. Header
You can use the header tag to show a header or a title page. There are 6 levels of headers that are commonly used starting from h1 to the most important to h6 for the less important.
Example of HTML Code<html>
<head>
<title>Header</title>
</head>
<body>
<h1>Header 1</h1>
<h2>Header 2</h2>
<h3>Header 3</h3>
<h4>Header 4</h4>
<h5>Header 5</h5>
<h6>Header 6</h6>
</body>
</html>
4. Bold Text
You can set a bold with <b> tag. "b" is an abbreviation of the word, which means thick.
Example of HTML Code<html>
<head>
<title>Bold</title>
</head>
<body>
<b>This text is bold.</b>
</body>
</html>
5. Italic
You set the italics text with the tag <i>. "i" is an abbreviation of italics.
Example of HTML Code<html>
<head>
<title>Italic</title>
</head>
<body>
<i>This text is italicised.</i> </body>
</html>
6. Underline
<u> Tag used to underline a text. "u" is an abbreviation of the underline.
Example of HTML Code<html>
<head>
<title>Underline</title>
</head>
<body>
<u>This text is underline.</u>
</body>
</html>
7. Line Breaks
Example of HTML Code<html>
<head>
<title>Line Breaks</title>
</head>
<body>
<p>Here is a...<br />line break.</p>
</body>
</html>
8. Horizontal Rule
Is an html tag that uses <hr> tag to create cross on your site. "hr" is the abbreviation of the word horizontal rule.
Example of HTML Code<html>
<head>
<title>Horizontal Rule</title>
</head>
<body>
Here's a horizontal rule... <hr /> ...that was a horizontal rule
</body>
</html>
9. Bulleted List
Example of HTML Code<html>
<head>
<title>Bulleted List</title>
</head>
<body>
<ul>
<li> Bulleted 1</li>>
<li> Bulleted 2</li>
<li> Bulleted 3</li>
</ul>
</body>
</html>
10. Numbered list
Note, that the only difference between the numbered list and bulleted list is the first letter of the list ("o" for a list of numbered, "u" to the list of bulleted).
Example of HTML Code<html>
<head>
<title>Numbered List</title>
</head>
<body>
<ol>
<li>Bulleted 1</li>
<li>Bulleted 2</li>
<li>Bulleted 3</li>
</ol>
</body>
</html>
11. Option
Select tag is used to display the register in a drop down menu options. Select tag must be used with option tag. Option tag is used to display the options available in the list of choices presented by select tag.
Example of HTML Code<html>
<head>
<title>Option</title>
</head>
<body>
<select name="options">
<option value="1">Option 1</option>
<option value="2">Option 2</option>
<option value="3">Option 3</option>
</select>
</body>
</html>
Attributes that you can use the select tag is as follows:
- name, used as an introduction to the your select tag.
- value, is a very important attribute of this tag as the value that will be submitted to process the input code is entered on the value of this attribute. For example, based on the previous HTML code, if you choose "Option 2" the code that is sent to process the program code is "2" as "2" is included in the value attribute to "Option 2".
- multiple, attribute is used to display more than one option. Typically use this attribute, followed by the size attribute.
- size, used to display more than one option.
<html>
<head>
<title>Option</title>
</head>
<body>
<select name="Option" multiple size=3>
<option value="1">Option 1</option>
<option value="2">Option 2</option>
<option value="3">Option 3</option>
</select>
</body>
</html>
- selected, an additional attribute in the option tag which is used to make a choice as an option selected automatically when the user does not replace existing options.
<html>
<head>
<title>Option</title>
</head>
<body>
<select name="Option">
<option value="1">Option 1</option>
<option value="2" selected>Option 2</option>
<option value="3">Option 3</option>
</select>
</body>
</html>
12. Font
the appearance of your text. You can specify color, size and type of character you want to use.
Example of HTML Code<html>
<head>
<title>Font</title>
</head>
<body>
<font color=#7F00FF size="5">My choice font</font>
</body>
</html>
Some attributes that can be used in font tag is:
- size, to determine the size of your text.
- color, used to determine the color of your text. To help you get the html color code you can use "Colorpic" or any other tool you have chosen the color.
- face, used to determine the type of character in your text. The selected font must be the kind existing in your computer.
<html>
<head>
<title>Font</title>
</head>
<body>
<font face="arial black">Text in Arial Black</font>
</body>
</html>
13. Form
<form> tag is used to insert the formula for the processing of the data that you fill inside input tag. The important attribute in form tag are the action and method.
- action, formula is used as input data processing. This formula must be written in a logical and understandable programming language such as html, asp, php and etc.
- method, used to determine how to transmit data to the formula of processing your data. You can decide if you want to use the method "get" or "post". The difference between this method is, if you use the method = get, you can view the data you have input on the content in your web browser's address bar. Instead, use method = post, will not show the data.
14. Input
<input> tag is used to enter data. Normally this tag is used inside form tag to process data or send data through the input tag.
Attribute type is important to determine the type of input you want to use. Some attribute type that you can use the input tag is:
- type = text, this attribute used to create inline text input box.
<html>
<head>
<title>Bold</title>
</head>
<body>
Input Text: <input type="text" name="input_text" />
</body>
</html>
- type = checkbox, This attribute is used for data entry options and encourage you to make more than one option.
<html>
<head>
<title>Input</title>
</head>
<body>
<input type="checkbox" name="checkbox 1"> Checkbox 1
<input type="checkbox" name="checkbox 2"> Checkbox 2
<input type="checkbox" name="checkbox 3"> Checkbox 3
</body>
</html>
- type = radio, This attribute is used for data entry option but encourage you to choose only one final choice.
<html>
<head>
<title>Input</title>
</head>
<body>
<input type="radio" name="sex" value="Female"> Female
<input type="radio" name="sex" value="Male"> Male
</body>
</html>
- type = password, These attributes encourage you enter your secret code into the input. Input is entered in the form of symbols to keep secret the text or code you enter.
<html>
<head>
<title>Input</title>
</head>
<body>
Password: <input type="password" name="password" />
</body>
</html>
- type = submit, These attributes result in the button that encourage you to click on the button to send your data. This attribute must be followed by the process in action inside the form tag.
<html>
<head>
<title>Input</title>
</head>
<body>
<input type=submit value=Submit>
</body>
</html>
- type = reset, This attribute is used to generate the button that encourage you to click on the button to clear the data you enter.
<html>
<head>
<title>Input</title>
</head>
<body>
<form action="" method=post>
Your Name: <input type=text name="names">
<input type=reset value=Reset>
</form>
</body>
</html>
15. Textarea
<textarea> tag is used to encourage you to fill in text into the text box in large quantities.
Example of HTML Code<html>
<head>
<title>Textarea</title>
</head>
<body>
<textarea name="textarea_1" cols=40 rows=5> Write your text here </textarea>
</body>
</html>
Some attributes that can be used in the textarea tag is:
- name, this attribute is used as an introduction to your textarea.
- cols, cols attribute is an abbreviation of the columns. Cols attribute is used to determine the measure of the width of your textarea.
- rows, rows attribute is used to determine the measure of your textarea height.
- readonly, this attribute only allows you to read and copy the text in the textarea, but can not change the text.
<html>
<head>
<title>Textarea</title>
</head>
<body>
<textarea name="textarea_2" cols=40 rows=5 readonly> This text is only for the read-only </textarea>
</body>
</html>
- Disabled, These attributes prevent you from changing the text in the textarea. You can only read the displayed text on it.
<html>
<head>
<title>Textarea</title>
</head>
<body>
<textarea name="textarea_3" cols=40 rows=5 disabled> Sorry, you can not copy the text </textarea>
</body>
</html>
Links are also known as "hyperlinks", defined by using tag <a> or element referred to as the "anchor". To make a "hyperlink", you use the tag in the href attribute (href is short for Hypertext Reference). The value of href attribute is a URL, or location where the link to the show.
Example of HTML Code
<html>
<head>
<title>Links</title>
</head>
<body>
Visit the <a href="http://www.sabah.net.my/">Sabah.Net Website</a>
</body>
</html>
Open links in a new window or current window / active
You can decide whether to open links in new window or the active window. You can do this by using the target attribute. For example, target = "_blank" to open links in new window.
Values that can be used in the target attribute is:
- _blank, To open a link to a new window.
- _self, To open a link to the existing window / active.
- _parent, To open a link in the window frame.
- _top, To open the link in the active browser window. When click on the frame, the link will come out on top frame.
<html>
<head>
<title>Bold</title>
</head>
<body>
Visit the <a href="http://www.sabah.net.my/" target="_blank">Sabah.Net Website</a>
</body>
</html>
Named Anchors
You can make your links "jump" to other parts of the same page using named anchors. You must first create a two-part code for the hyperlink.
1. Create your first Named Anchors in which consumers will be ended.
Example of HTML Code<html>
<head>
<title>Links</title>
</head>
<body>
<a name="top"><b>Link Targets</b></a>
</body>
</html>
2. Then a hyperlink. This is done by connecting the name of the named Anchors with leading names in the hash symbol (#).
Example of HTML Code<html>
<head>
<title>Links</title>
</head>
<body>
<a name="top"><b>Link Targets</b></a>
<p>Some text here</p>
<p>Some text here</p>
<p>Some text here</p>
<p>Some text here</p>
<p>Some text here</p>
<p>Some text here</p>
<p>Some text here</p>
[<b><a href="#top">top</a></b>]
</body>
</html>
Email Links
You can create a hyperlink to the email address using the mailto attribute in the anchor tag.
Example of HTML Code<html>
<head>
<title>Email Links</title>
</head>
<body>
<a href="mailto:support@sabah.net.my">Email Us</a>
</body>
</html>
You can also fill in the email subject for your users automatically,
Example of HTML Code<html>
<head>
<title>Email Links</title>
</head>
<body>
<a href="mailto:support@sabah.net.my?subject=Question&body=Dear Sir">Email Us</a>
</body>
</html>
To insert an image into a website, you should use <img src> tag, to determine the exact location of the file.
Example of HTML Code<html>
<head>
<title>Images</title>
</head>
<body>
<img src="../images/sabah flag.png" width="250" height="150" alt="Sabah" />
</body>
</html>
Some attributes that can be used in the img tag is:
- src, this attribute is used to find the true position of the image is located. This can prevent you from having problems viewing the image as follows:


- width, used to determine the width of the image display.
- height, used to determine the height-image display.
- alt, Alternative text is used to display the image if the case can not display the image in your browser.
<html>
<head>
<title>Table</title>
</head>
<body>
<table border=1>
<tr>
<th>Title</th>
<th>Member Name</th>
<th> Member ID</th>
</tr>
<tr>
<td rowspan=2>Ms. </td>
<td>Rochella</td>
<td>850603-12-5963</td>
</tr>
<tr bgcolor=#D2D2D2>
<td>Sylvia</td>
<td></td>
</tr>
<tr>
<td>Mr. </td>
<td>Ronald </td>
<td>821220-12-6598</td>
</tr>
</table>
</body>
</html>
Basic attributes that can be used in the table tag are:
- <th></th>, expand and bold as the head table.
- <tr></tr>, used as a row in the table.
- <td></td>, a box for each text in the table.
- border=" ", determine the thickness of table borders.
- width=" ", to determine the table width in pixels.
- height=" ", determine the table height in pixels.
- bgcolor=" ", determine the table color.
Want to create a Blog?
Blogs are increasingly popular in conjunction with other social networks. Blogs also have a huge influence on mass media and other Internet users around the world. Some people make the blog as their homepage. More and more companies are encouraged to make their business through a blog that is easy to identity, advertising and booking.
Currently, there are dozens of services that offer to make your blog more easily and free. Such as blogspot, wordpress, blogger, Vox and etc. Through a search engine as you can find too many types of blogs that have been loaded such as a political blog, health and beauty blog, religion blog, education blog and etc.How to Blog?
You can create a blog with easy to use software services such as wordpress. You can download this software free of charge via the Internet. You now have a basic knowledge of html, so this can help you to understand the software easily.The difference between a blog with your website is, blogs more to social network which allows you to interact with other users around the world via the same Internet network. Some features that must appear on your blog is:
- You are easy to update your post with the new version.
- Your blog visitors can send comments on your blog.
- Blogs are easy to change themes, add a link, activate the plugin and add categories.
- Automatic post.
- Blogs can be a sales or personal websites.